EECS 298: Social Consequences of Computing
Setup up VS Code for Python
Visual Studio Code is a lightweight, easy-to-use, source code editor with debugging support. It runs on macOS, Windows, and Linux (including CAEN Linux). Visual Studio Code is not the same program as Visual Studio.
If you already have VS Code installed with the Python extension, skip to the Create a project section.
Prerequisites
VS Code relies on external command line tools. If you haven’t installed CLI tools on your machine yet, follow one of these tutorials first.
| macOS | Windows | Linux |
Next, follow our Command line interface (CLI) tutorial.
Install
Choose your platform below. Be sure to install the relevant extensions.
Linux
Install the .deb package at https://code.visualstudio.com/docs/setup/linux.
CAEN Linux
VS Code is already installed on CAEN Linux desktop environment. You can use it while sitting at a CAEN Linux computer, or through a VNC connection to CAEN Linux.
macOS
Make sure you have macOS 11.1 or later.
$ sw_vers
ProductName:	macOS
ProductVersion:	11.7
Use the homebrew package manager to install VS Code. You can run this command from any directory.
$ brew install --cask visual-studio-code
Windows
Pro-tip: Windows-only users may find it difficult to navigate the file structure at first. Make sure you understand how to locate your files according to the WSL tutorial.
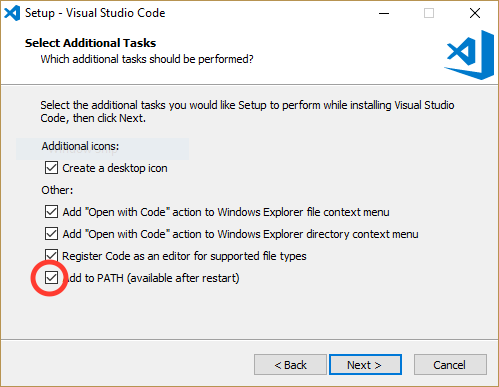
Then, Install VS Code from the web https://code.visualstudio.com/.
Select “Add to PATH”.
Reboot. Open a terminal again (WSL/Ubuntu) and verify your installation. Your version might be different.
$ code --version
1.74.1
1ad8d514439d5077d2b0b7ee64d2ce82a9308e5a
x64
Extensions
Make sure VS Code is installed correctly by checking the version. You need version 1.52.1 or higher.
$ code --version
1.52.1
Install the VS Code Python extension.
$ code --install-extension ms-vscode.cpptools
Verify that the extension is installed. It’s OK if you have other extensions installed.
$ code --list-extensions
ms-python.python
Create a project
If you plan to access course resources from multiple machines this semester, you may wish to do your development work on a remote server rather than a local machine. Learn about how to access U-M servers remotely via VS Code in the Remote Development tutorial.
To create a VS Code project, create a folder (directory). There are many ways to create folders: Finder/File Explorer, the VS Code interface, VS Code integrated terminal, and the system terminal. We’ll use the system terminal and call our example project p1-stats.
macOS: Open the Terminal application.
Windows/WSL: Open the Ubuntu application.
Navigate to the directory where you store your projects, create a new directory, then move into the new directory. Your folder location might be different. Here’s some help with cd, the tilde ~, and mkdir.
$ mkdir ~/eecs298
$ cd ~/eecs298
$ mkdir lab1
$ cd lab1
Pitfall: Avoid paths that contain spaces. Spaces causes problems with some command line tools.
| Bad Example | Good Example |
|---|---|
EECS 298/ |
eecs298/ |
Lab 1/ |
lab1/ |
Start VS Code and open your project folder by selecting File > Open Folder... > navigate to your home folder.
Pro-tip: Here’s a quick way to open VS Code to a specific project folder from the command line. First make sure you’re in the directory that contains your source code.
$ ls
main.py ...
$ code .
Add new files
Select the add file icon and give it a name, e.g., lab1.py.
Alternatively, create your lab1.py file from the command line using touch.
$ touch main.cpp
You can find the built-in VS Code terminal at the bottom of the window. If there if no terminal open, start one by selecting Terminal > New Terminal and navigating to the correct location via the command line.
Run
Use the terminal to navigate to the folder containing the Python file you wish to run. Run the file by using python3.
$ python3 main.py
You can also interface with the Python interpreter interactively within
$ python3
This will launch the Python interpreter within your terminal, which you can use to test lines of Python code. To exit the Python interpreter, use
$ exit()
Acknowledgments
Original document written by Andrew DeOrio awdeorio@umich.edu.
This document is licensed under a Creative Commons Attribution-NonCommercial 4.0 License. You’re free to copy and share this document, but not to sell it. You may not share source code provided with this document.